Primer ús i proves bàsiques de PhotoRobot
La documentació següent proporciona instruccions tècniques per al primer ús i les proves bàsiques d'un dispositiu PhotoRobot. Això inclou informació detallada sobre la configuració de la xarxa i els requisits de xarxa per utilitzar PhotoRobot. Hi ha instruccions per connectar llums Fomei i Broncolor, trobar l'adreça IP d'un PhotoRobot i per a les proves bàsiques del control de moviment mitjançant la GUI de servei. Aquesta informació està destinada a ser utilitzada pels nous clients de PhotoRobot en combinació amb les instruccions específiques i els manuals d'usuari proporcionats per al seu dispositiu específic.
Important: La instal·lació inicial d'un dispositiu PhotoRobot ha de ser sempre a través d'una autoritat autoritzada de PhotoRobot. Les autoritats autoritzades inclouen un distribuïdor homologat o un representant del propi fabricant.
Nota: Consulteu sempre la informació i les instruccions de seguretat de PhotoRobot a més del manual proporcionat específicament amb el vostre dispositiu abans d'utilitzar PhotoRobot per primera vegada.
1. Abans del primer ús de PhotoRobot
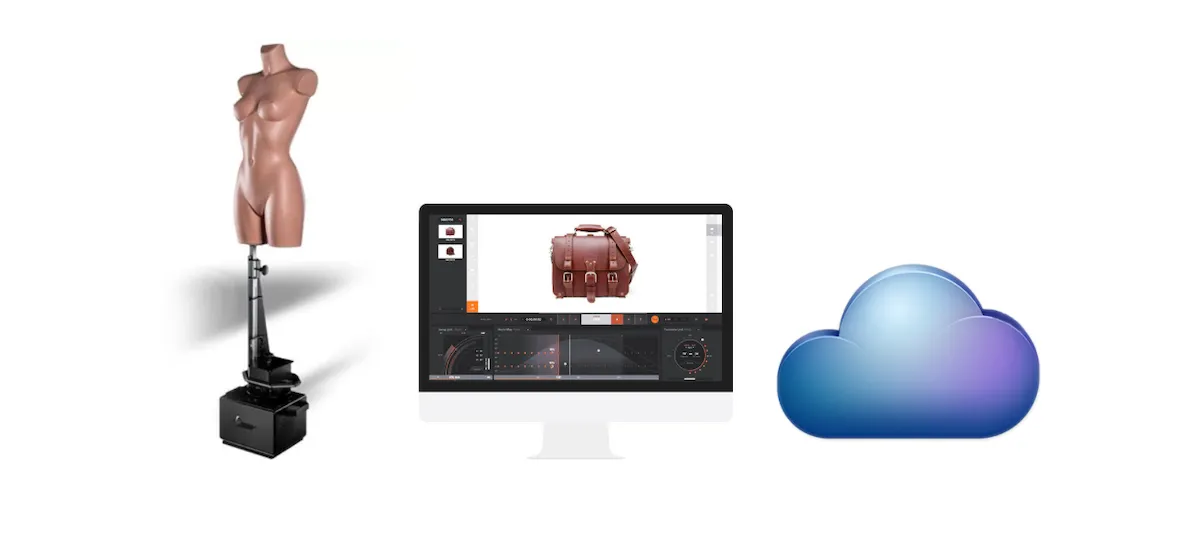
Des d'una perspectiva tècnica, és important entendre abans del primer ús que PhotoRobot és una unitat modular formada per components de maquinari i programari. Això requereix que PhotoRobot estigui connectat a la mateixa xarxa que l'ordinador que l'opera. La xarxa ha de tenir connexió a Internet per accedir als serveis de PhotoRobot, que s'executen al núvol. A continuació, existeixen els requisits previs de xarxa següents.
1.1. Configuració de la xarxa
Per configurar la xarxa per comunicar-se correctament amb PhotoRobot, la xarxa ha de complir els requisits previs següents.
- La unitat de control s'ha de connectar a la xarxa local.
- Es necessita un ordinador per executar la interfície gràfica de servei o el programari de l'operador anomenat _Controls.
- L'ordinador s'ha de connectar a través de la mateixa xarxa que la unitat de control.
- Hi ha d'haver una connexió a Internet funcional a la xarxa.
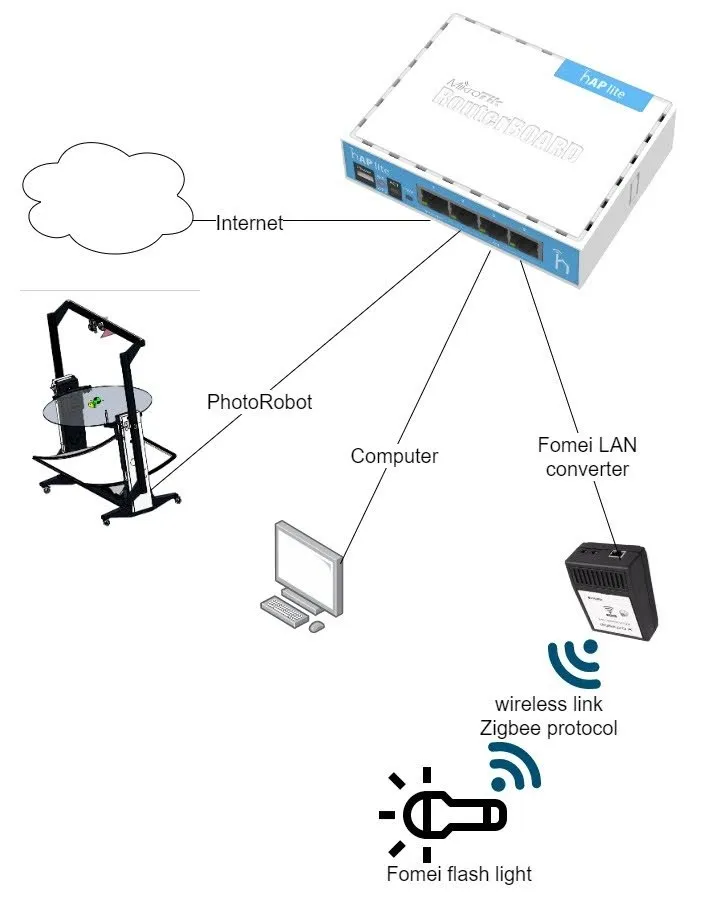
1.2. Esquema de connexió de llums de flaix Fomei
A continuació es mostra l'esquema de connexió per a les llanternes Fomei. Nota: El tipus d'encaminador pot variar si la caixa del bastidor es lliura amb la solució PhotoRobot.
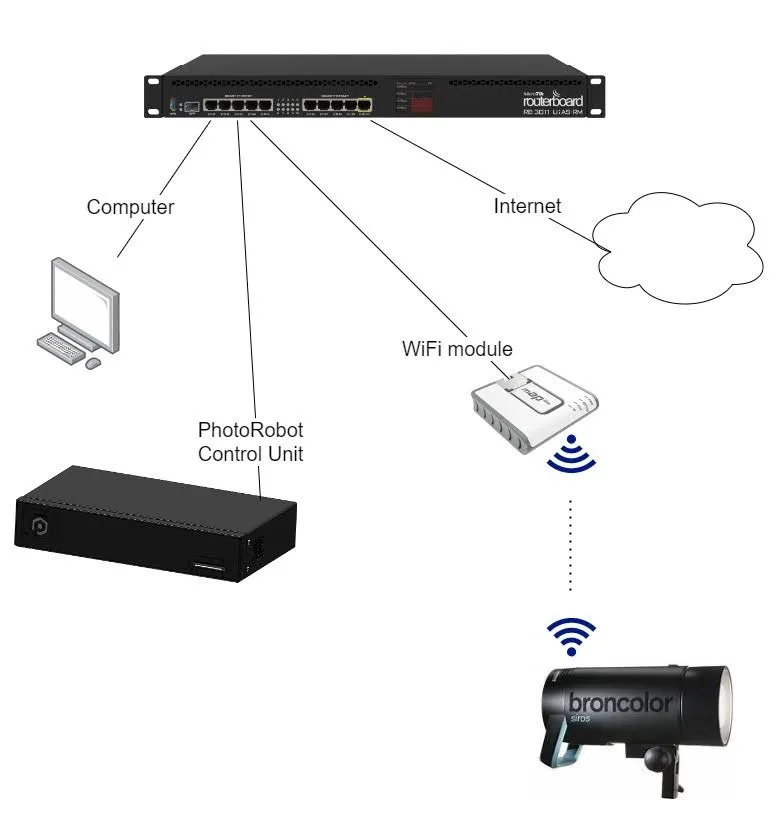
1.3. Esquema de connexió de llum de flaix Broncolor
Utilitzeu el següent mapa sobre l'esquema de connexió per a les llanternes Broncolor, tenint en compte que el tipus d'encaminador pot variar. Nota: Consulteu PhotoRobot - Gestió de llums Broncolor per obtenir més informació sobre els components de maquinari i programari relacionats necessaris per utilitzar-los amb PhotoRobot.
1.4. Distribució d'electricitat i requisits de xarxa
Comproveu els paràmetres del sistema de distribució d'electricitat, per exemple, la tensió i la freqüència. Per fer-ho, utilitzeu el connector RJ45 a la part posterior de la unitat de control. Nota: Si la configuració de la unitat de control no compleix, configureu-la primer localitzant el selector de tensió manual a la part posterior de la unitat de control. A continuació, connecteu la unitat de control a la xarxa mitjançant un cable ethernet mitjançant el connector RJ45.

La xarxa ha de complir els requisits bàsics següents:
- S'espera un servidor DHCP a la xarxa.
- S'ha de permetre la comunicació dels ports TCP 7777, 7778.
- S'han de permetre les emissions UDP al port 6666.
- És necessària connexió a Internet.
- *. photorobot.com s'ha de permetre l'accés.
- as-unirobot.azurewebsites.net s'ha de permetre l'accés.
- Consulteu Requisits previs detallats de xarxa de PhotoRobot per obtenir més informació.
- Connecteu l'endoll a la presa de corrent.
Després de connectar la unitat de control, premeu l'interruptor de xarxa del panell frontal de la unitat de control. Quan canvia d'estat d'una llum intermitent a una llum fixa, està a punt per funcionar.
1.5. Cerqueu l'adreça IP de PhotoRobot a la LAN
Després d'una configuració adequada de la xarxa, cal cercar i identificar l'adreça IP de PhotoRobot a la LAN. Per fer-ho, l'aplicació PhotoRobot Locator s'integra directament dins de CAPP per facilitar la cerca i identificació de les Unitats de Control a la xarxa. Assegura't d'utilitzar la versió més actualitzada de CAPP per accedir a aquesta funció.
Després, per identificar un robot a la xarxa directament dins de CAPP, obre la versió local de CAPP, ves a Configuració i fes clic a Robots / Unitats de control.
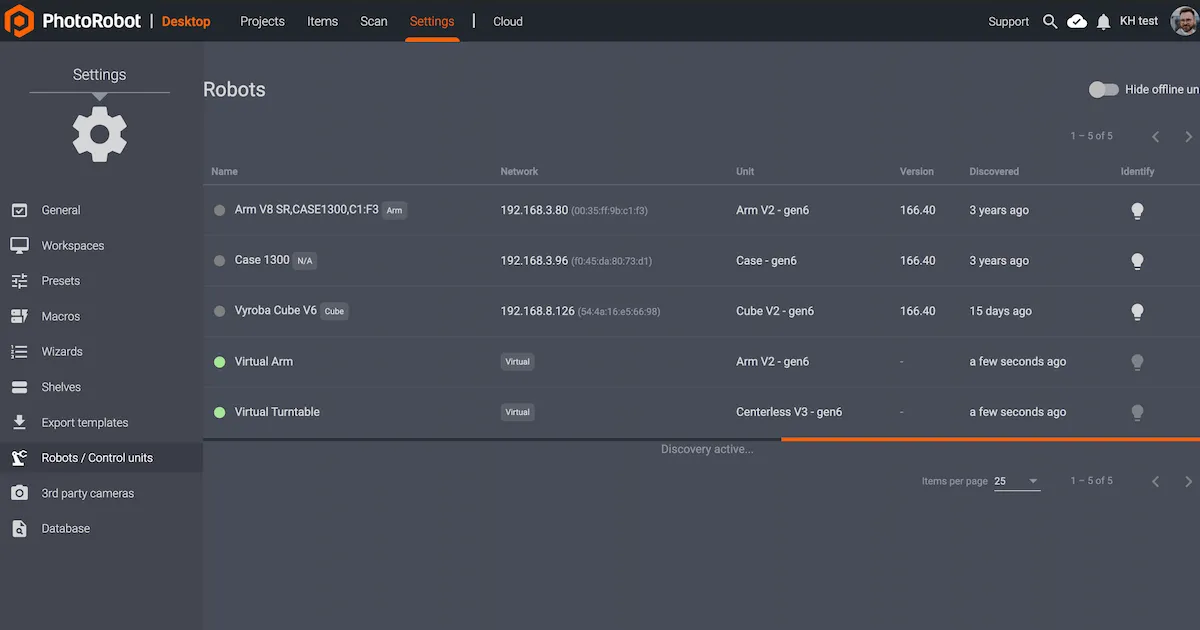
El menú de configuració de Robots / Unitats de Control mostra columnes amb Nom, Xarxa, Unitat, Versió, Descobert i Identificació per a cada robot. Si el punt a l'esquerra del nom del robot és verd, està en línia. Fer clic al camp del robot s'obrirà la interfície web del robot. Això també farà que la llum LED de la unitat de control del robot parpellegi en verd per facilitar la seva identificació.
Si el client requereix descàrrega externa de l'aplicació, PhotoRobot Locator també està disponible per a descàrrega a iOS dins de les Descàrregues de Comptes PhotoRobot.
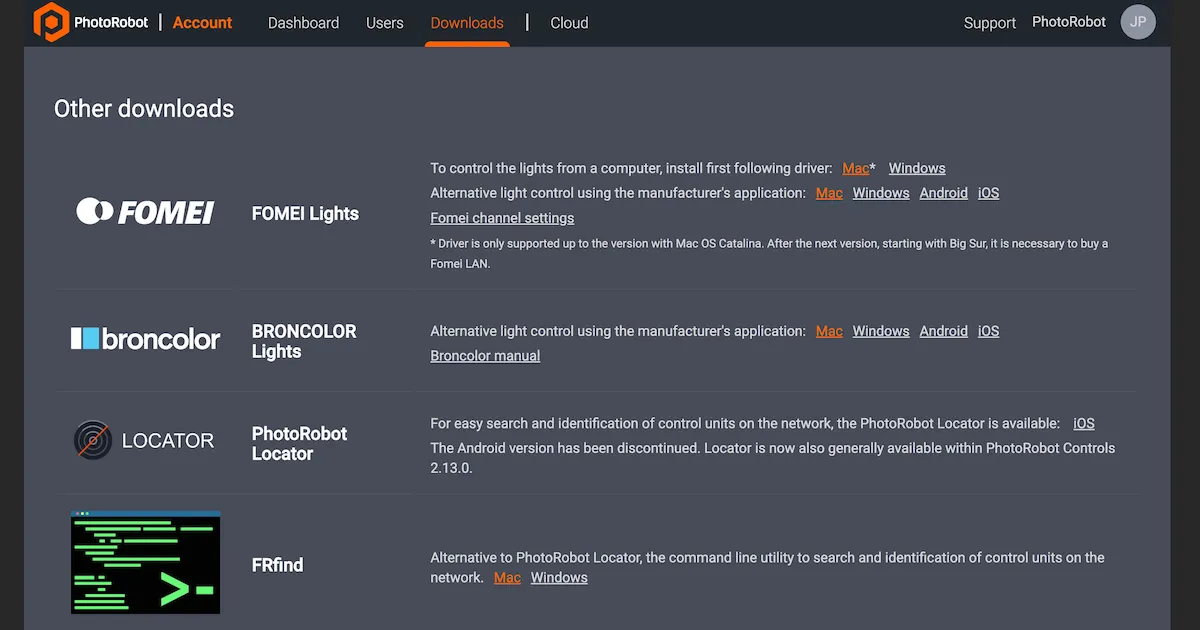
Nota: La versió per a Android de PhotoRobot Locator ha estat descontinuada.
Alternativament, hi ha la utilitat de línia de comandes FRFind per a MacOS o Windows per cercar a la xarxa i identificar unitats de control PhotoRobot. Troba enllaços per descarregar FRfind també a la pàgina de Descàrregues de Comptes de PhotoRobot.
2. Proves bàsiques a la GUI del servei
Després de localitzar l'adreça IP del dispositiu PhotoRobot, introduïu l'adreça IP a qualsevol navegador web en format URL. Això llançarà la interfície gràfica de servei, que mostra una interfície d'usuari bàsica per provar el control de moviment de PhotoRobot.
La interfície d'usuari consta de dos elements principals: estat del sistema i estat del mòdul de moviment.
- La informació d'estat del sistema es mostra a la part superior de la interfície d'usuari. Conté informació d'estat del sistema PhotoRobot. Això inclou l'estat funcional, l'estat de connectivitat i els detalls de l'estació de treball, l'activitat i les operacions.
- Mostra l'estat del mòdul a la meitat inferior de la interfície d'usuari. Proporciona controls de moviment per a proves bàsiques i també mostra l'estat del maquinari, inclòs el calibratge, el moviment, els passos executats, els moviments i els girs.
Per provar el control de moviment del dispositiu PhotoRobot, utilitzeu els comandaments a distància de l'estat del mòdul de moviment de la interfície gràfica de servei:
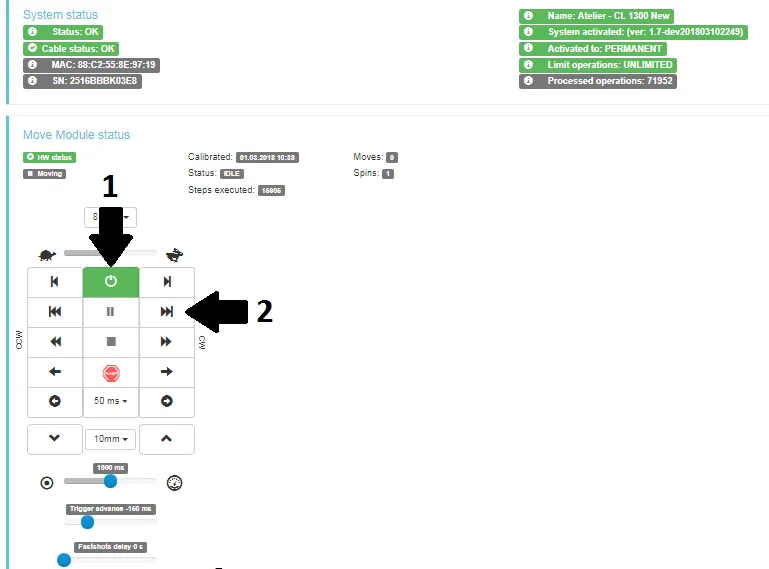
- Engegueu els motors (1) i intenteu accionar qualsevol part mòbil del robot (2). Si el robot es mou segons les vostres instruccions, el dispositiu PhotoRobot està preparat per al funcionament regular.
3. Programari PhotoRobot _Controls
El programari PhotoRobot_Controls aplicació proporciona control remot de PhotoRobot dispositius. PhotoRobot _Controls App integra el control sobre robots, càmeres, il·luminació i postproducció. Això inclou suport per a totes les etapes de la gestió del flux de treball per proporcionar la funcionalitat necessària per a una automatització efectiva en el postprocessament.
Tingueu en compte que PhotoRobot _Controls programari de l'aplicació no està inclòs amb el lliurament de la màquina. El programari es pot descarregar a través del vostre compte de PhotoRobot i es compra per separat de la màquina. A més, després d'iniciar l'aplicació de programari, tingueu en compte que la interfície podria iniciar-se automàticament en "mode assistent". El mode assistent és una interfície d'usuari simplificada que només permet escanejar codis de barres per identificar objectes i començar les seqüències de captura i postprocessament automàticament.
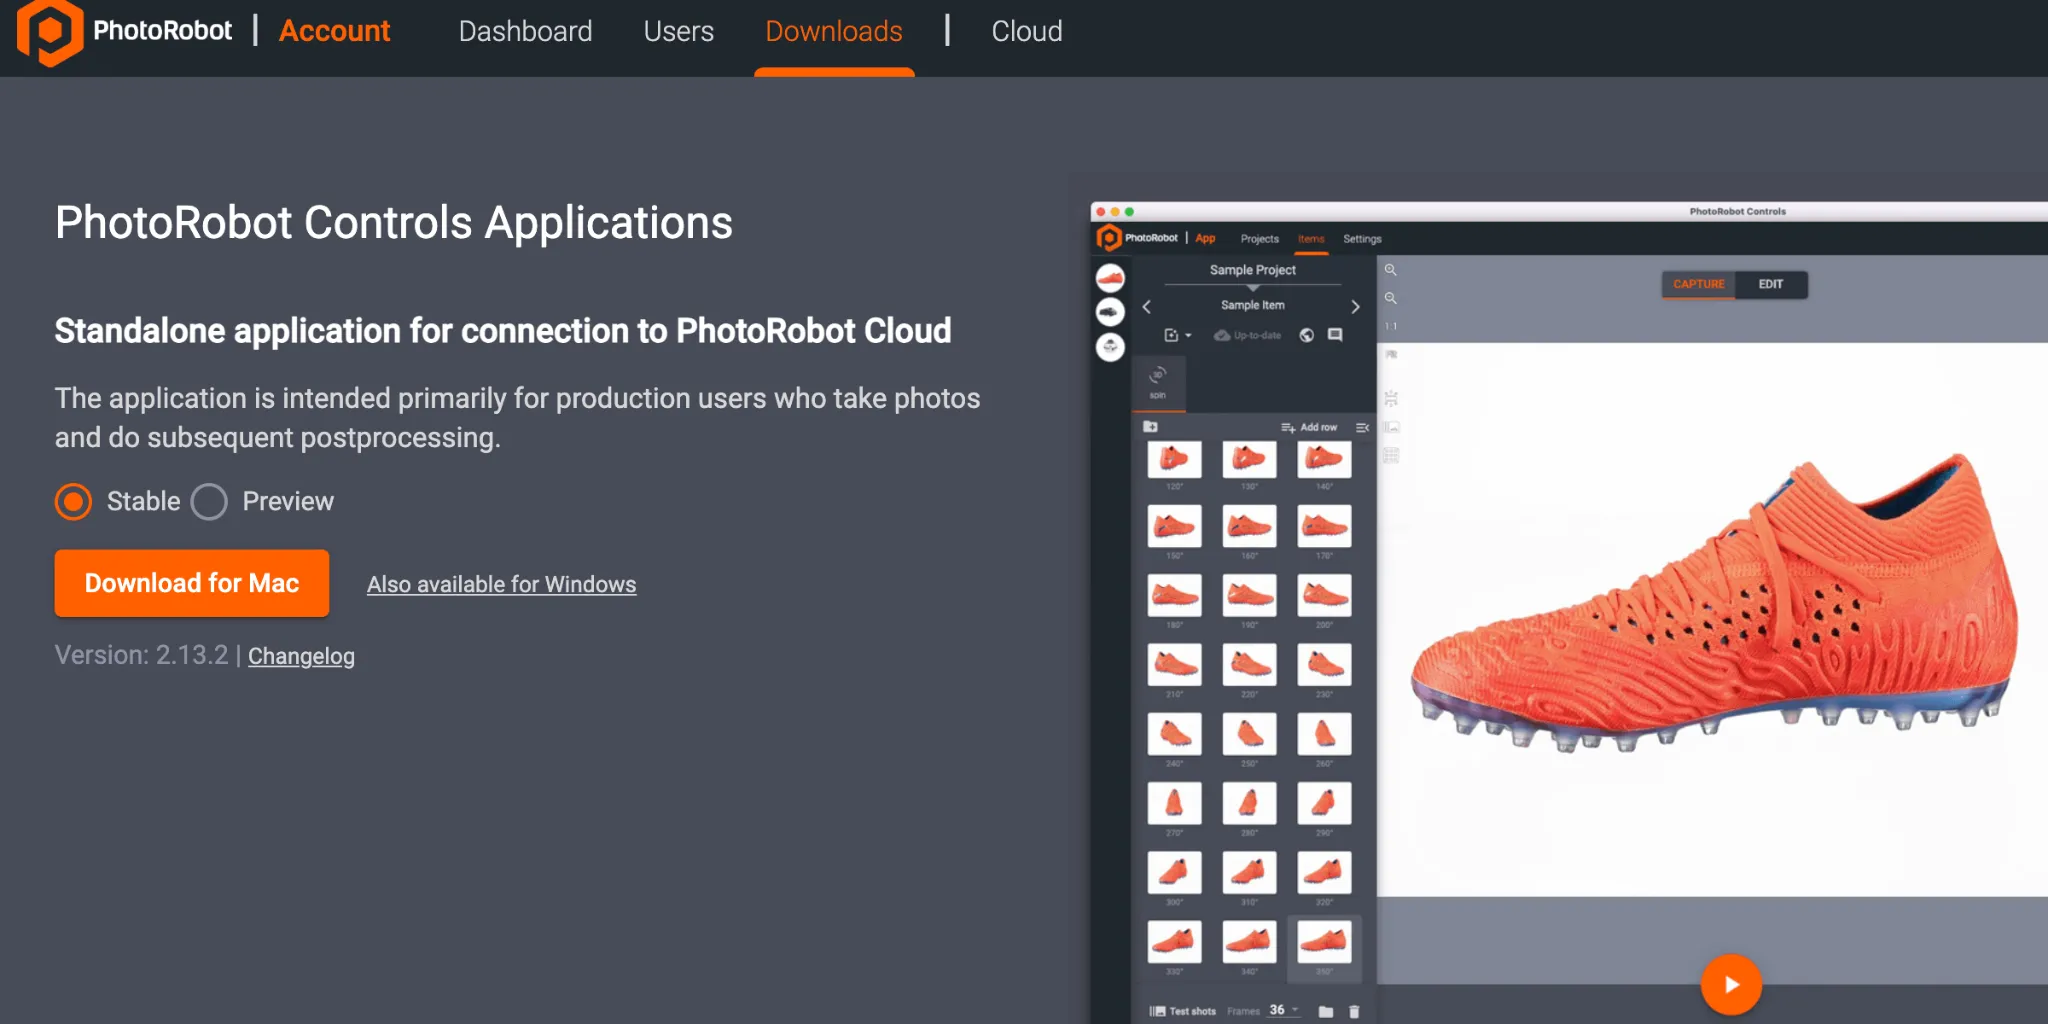
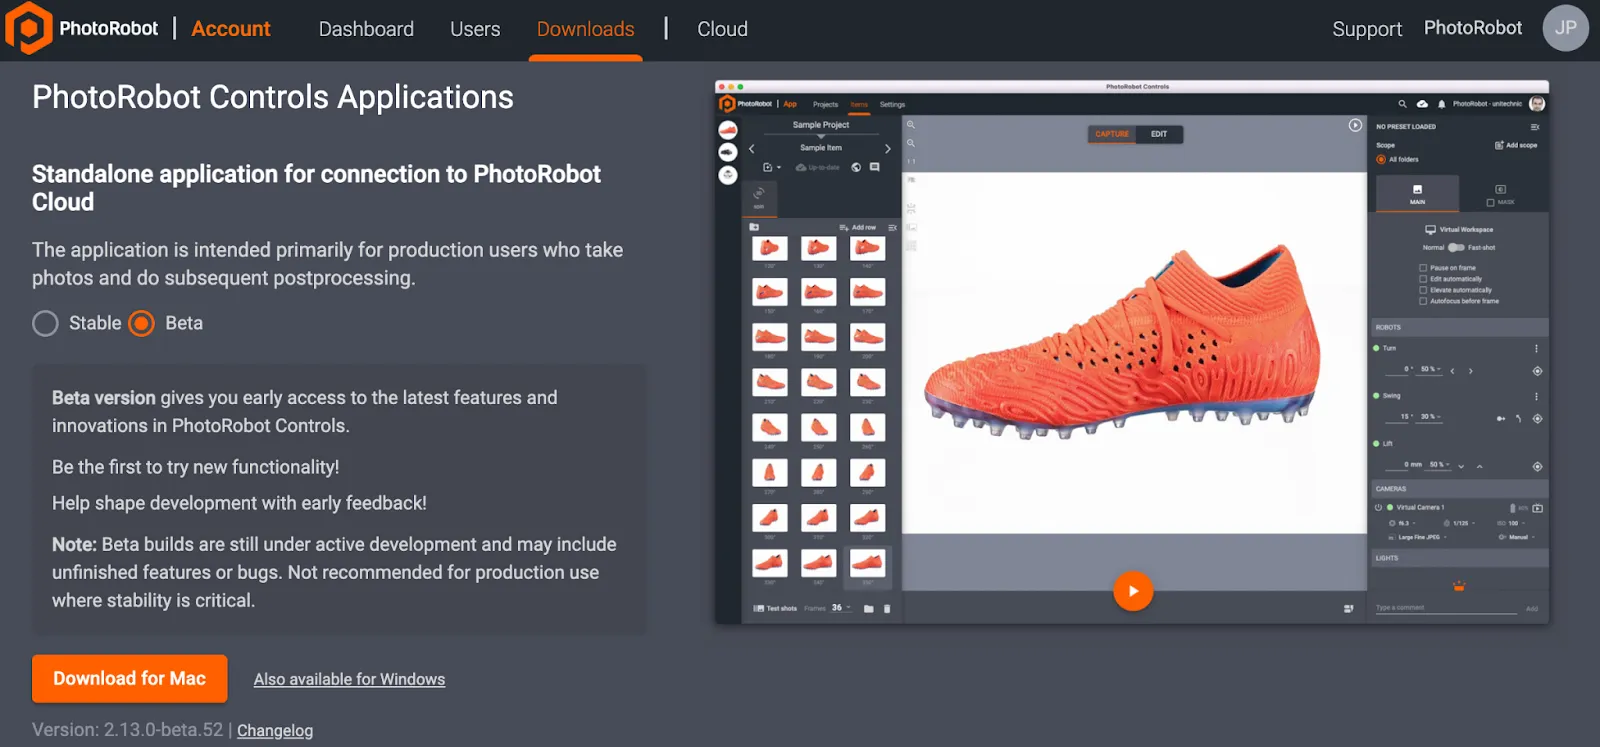
Nota: Tant la versió estable com una versió prèvia de CAPP estan disponibles per descarregar mitjançant l'assistent d'instal·lació. La versió estable conté la versió més recent de CAPP i rep versions freqüents. Mentrestant, la versió prèvia de CAPP proporciona accés anticipat a les últimes funcions i correccions que es transfereixen a la versió estable als pocs dies del desenvolupament. Això permet als usuaris provar qualsevol problema que es produeixi a la versió de visualització prèvia abans de contactar amb el suport, ja que la majoria dels problemes notificats a la versió estable ja s'han resolt a la versió de visualització prèvia. Tanmateix, tingueu en compte que la versió de vista prèvia no es recomana per a ús en producció en què l'estabilitat és un factor crític. La versió de vista prèvia està en desenvolupament actiu, que encara pot incloure característiques incompletes o errors no resolts.
Important: Les versions anteriors de CAPP no estan pensades per a la distribució pública o de clients a causa del risc de corrupció de la base de dades. Les versions anteriors de CAPP només són accessibles per als tècnics autoritzats de PhotoRobot per al desenvolupament intern o per a casos d'ús extremadament especials. Per trobar la versió estable més recent i la versió prèvia de CAPP, consulteu les últimes versions de descàrrega de CAPP.
Per obtenir assistència o resolució de problemes de PhotoRobot _Controls aplicació, consulta PhotoRobot Introducció.


Sèrie EOS Rebel


Sèrie EOS DSLR


Sèrie sense mirall EOS M


Sèrie PowerShot


Primer pla / De mà

La sèrie Canon EOS Rebel ofereix càmeres DSLR aptes per a principiants amb una qualitat d'imatge sòlida, controls intuïtius i funcions versàtils. Ideals per als entusiastes de la fotografia, aquestes càmeres ofereixen un enfocament automàtic fiable, pantalles tàctils d'angle variable i gravació de vídeo Full HD o 4K.
Connexió
Resolució (MP)
Resolució
La sèrie Canon EOS DSLR ofereix imatges d'alta qualitat, enfocament automàtic ràpid i versatilitat, la qual cosa la fa ideal tant per a la fotografia com per a la producció de vídeo.
Connexió
Resolució (MP)
Resolució
La sèrie Canon EOS M Mirrorless combina un disseny compacte amb un rendiment similar a la DSLR. Amb lents intercanviables, enfocament automàtic ràpid i sensors d'imatge d'alta qualitat, aquestes càmeres són ideals per a viatgers i creadors de contingut que busquen portabilitat sense sacrificar la qualitat de la imatge.
Connexió
Resolució (MP)
Resolució
La sèrie Canon PowerShot ofereix càmeres compactes i fàcils d'utilitzar per a tiradors casuals i entusiastes. Amb models que van des de simples càmeres de punta i dispar fins a càmeres de zoom avançades, ofereixen comoditat, qualitat d'imatge sòlida i funcions com l'estabilització d'imatge i el vídeo 4K.
Connexió
Resolució (MP)
Resolució
Les càmeres de mà i de primer pla de Canon estan dissenyades per a fotografies i vídeos detallats i propers. Compactes i fàcils d'utilitzar, ofereixen enfocament de precisió, imatges d'alta resolució i capacitats macro versàtils, perfectes per a vlogging, fotografia de productes i primers plans creatius.


